Sections:
- What are Lead form ads?
- How to set up Lead Generation ads
- Step-by-Step Guide to Setting up Lead Generation Ads
- How to Create an Instant Form to collect leads directly on Facebook/Instagram
If you’re reading this, you’ve likely hit a snag when creating a Lead Form [or Lead Generation] campaign on Facebook Ads Manager, so you turned to Google, and Google in turn sent you to us. Hello! We are happy to help.
Below, we will outline the hows and whys of creating lead generation ads on Facebook and Instagram through the Facebook Ads Manager step by step. This guide was created in March 2019. If by the time you are reading this some portion of the process below does not match what you are seeing because of Facebook’s frequent updates to its ads platform, please don’t hesitate to reach out to us via email for help.
Let’s begin.
What are Lead Form ads?
Lead form ads are an ad type served from an ad account on Facebook’s Ads Manager which allow advertisers to collect information from potential customers without those customers having to leave the native environment of Facebook or Instagram. Advertisers can then use this information to turn those potential customers into actual customers.
How much data can I get through a Lead Form ad?
You can ask for as little as just an email. Or you can create fields for email, first name, last name, phone number, street address, city, state/province, country, post code/zip code, date of birth, gender, marital status, relationship status, military status, job title, work phone number, work email, company name, and even national ID number for certain Latin American nations. Plus, you can add custom questions in short answer or multiple choice format and even use conditional logic and appointment scheduling. Keep in mind that asking lots of questions will give you EXTREMELY qualified, but very few leads.
Why do lead forms work?
The upshot is that because this all happens in an instant form hosted on Facebook or Instagram, the customer is much more likely to hand over their info to you. (Even after the privacy concerns Facebook has faced after the Cambridge Analytica scandal). This comes down to the concept of “friction” in digital marketing. The more steps in the customer journey between viewing an ad to completing the goal you want them to, the more customers will drop off before the finish line.
So, by eliminating the step of sending someone out of their beloved Instagram app to your (possibly clunky, kinda-sorta mobile-optimized) landing page to collect their email, you get many more leads for the same spend. Wow, one of your KPIs has just jumped an order of magnitude! (We recently cut a client’s cost-per-lead by 90%.)
Okay, with the what and the why out of the way, let’s move onto specifics.
How to create Facebook Lead Generation ads:
Here’s a Lead Gen checklist of the access and assets you need:
- A Facebook Business Manager account with Admin access
- An Ad Account for the business advertised for (if you are an Agency advertiser, you likely have many ad accounts attached to your Business Manager account)
- Admin access to the Facebook Page you want to serve ads from
- If you want to run ads from an Instagram account instead of your Facebook page acting as a virtual Instagram page, an Instagram account connected to your Business Manager
- An active credit card updated in the Payment Settings of your Ad Account
- Admin Access to Leads Access – which we will cover later on
- URL of the business’s privacy policy
- Creative assets – video or images in multiple sizes and corresponding copy – much more on that below
- A CRM and a follow-up strategy
What are you going to do with all these leads? Are they feeding directly into a CRM? Are you going to download the leads and upload them a CRM or keep them in a database? Do you have a marketing automation platform set up? Do you have automated emails drafted and queued to send as soon as leads come through to deliver on what you promised through your ad? If you are using separate platforms for each of those services, are they all talking to each other the way they should be? The whole point of this ad type is to move Facebook/Instagram users into your conversion funnel to eventually make them customers. Before starting this sort of a campaign you should have a clear idea of how you are going to follow up with these people in a timely manner. Otherwise, you’re just throwing away your money! (If you’re at a loss on where to start here, TEMPO can help.)
- Finally – a laptop or desktop computer. While Facebook has been improving its mobile ads manager, you will likely find that experience frustrating at best.

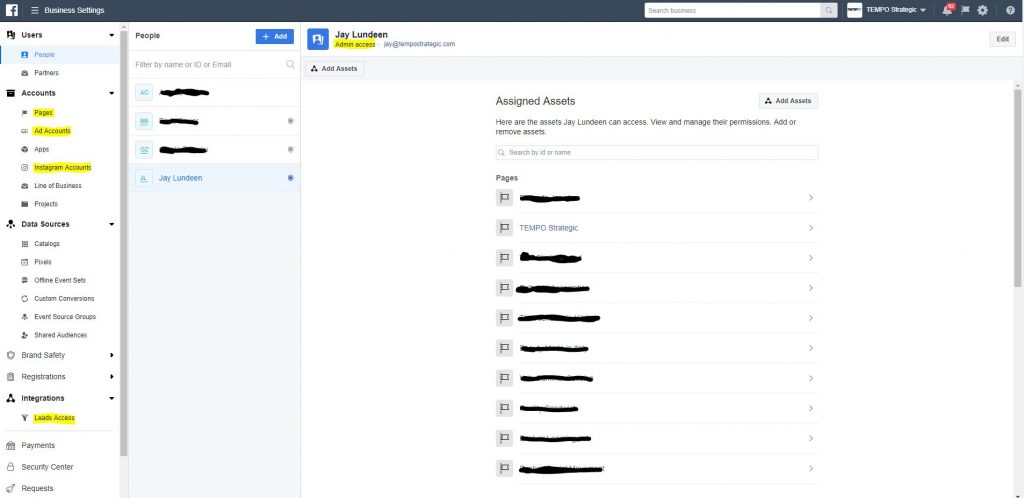
Facebook Business Manager Interface
Step-by-Step Guide to Setting up Lead Generation Ads
1. Open up Ads Manager
- You find this by clicking the three horizontal lines in the upper left corner of Business Manager and then selecting Ads Manager (often under Frequently Used, otherwise under Create & Manage, which can be found by clicking All Tools to expand the menu)

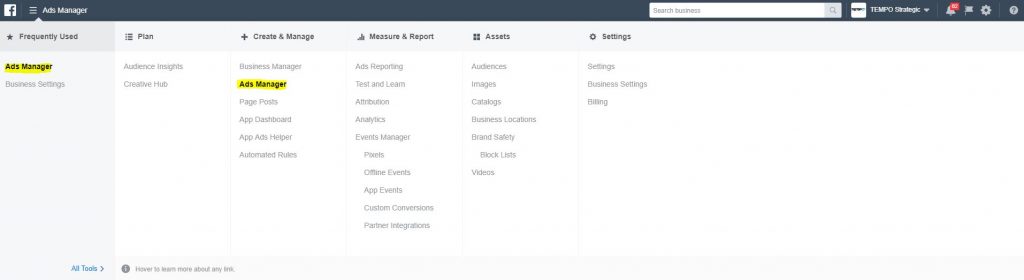
Ads Manager Dropdown Menu
2. Select your desired ad account from the dropdown menu
- Click the dropdown menu just below the upper border on Ads Manager, then click on the account you’re looking for. In the example below, we’ll select “Test”


Ad account dropdown menu
3. Click the green + Create button on the left side of the page or the grey Create Ad button in the middle of the page.
4. Ads Manager will likely default you to the Quick Creation pop-up. This functionality is fine if you know exactly what you’re doing, but, since you’re reading this, let’s assume you don’t. Switch to Guided Creation by hitting the button on the top right of the pop-up.


Facebook Campaign Quick Creation
5. Choose an objective for the campaign
- For Lead generation campaigns, choose the Lead generation objective

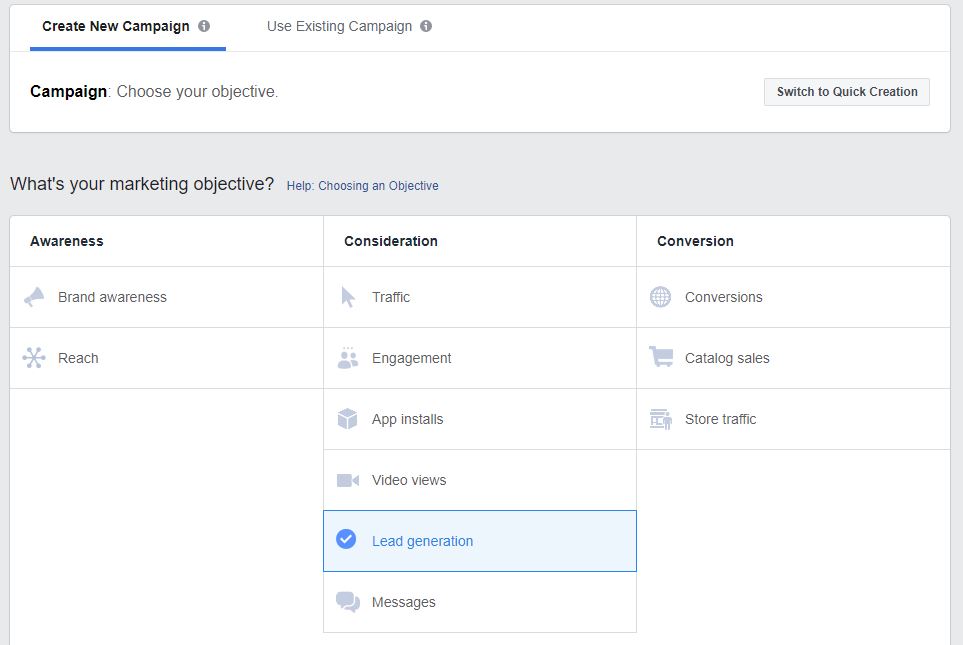
Facebook Campaign choose an objective
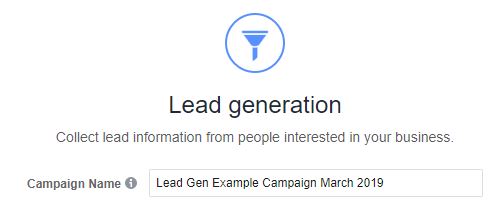
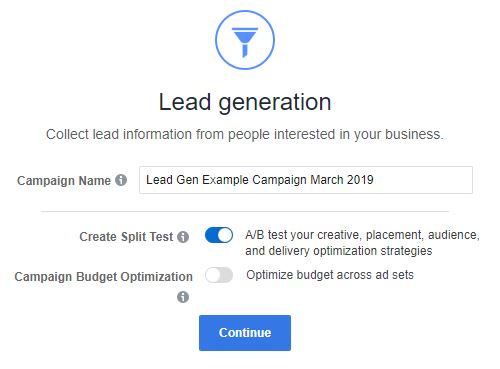
6. Name your campaign
- It’s best to choose a name that can be quickly and clearly understood and differentiated from other campaigns, so be specific. We’ll use “Lead Gen Example Campaign March 2019”

Facebook lead generation campaign name
7. Decide whether you want Facebook to create a split test using your Ad Sets, use Budget Optimization between ad sets, or use neither option
What kind of test do you want to run? A split test will preclude you from using the Budget Optimization feature (because the Split Test is already controlling budgets across ad sets). This is a good option if you’re starting fresh and know little about your brand’s different potential audiences and their performance and want to build up robust data and insights about audience and creative as part of a long term strategy. Budget optimization is a good option if you have multiple audiences you want to reach or multiple creative options you want to put out there but care most about the end goal of the campaign. You might try this option if you already have some good knowledge about different types of audience and creative those audiences respond to by creating a lot of different ad sets with different constellations of audience/creative/placement/delivery options and letting Facebook’s algorithm do the work to spend most on the best performing ad set. This is a quick and dirty way to make a campaign perform. If you choose neither option, you will set budget on the ad set level. This option makes sense if you have only one audience or specific spend requirements for different audiences or creative options. Generally, selecting one of the two options above is the better choice.
- If you go with Split Testing, it’s important to be rigorous in the set-up by only making one change per ad set (whether creative, audience, placement, or delivery optimization) while keeping all other variables the same and spending enough money to have statistically significant results if you want the data collected from the test to have any value from which to draw conclusions. Facebook will split up your audience and make sure there is no bidding overlap on the same audience between ad sets.
- You can ignore the “Campaign Spend Limit” option below the continue button here because you will be setting total budgets under the Ad Set section of set-up.

Facebook Lead Gen Split Test Selection
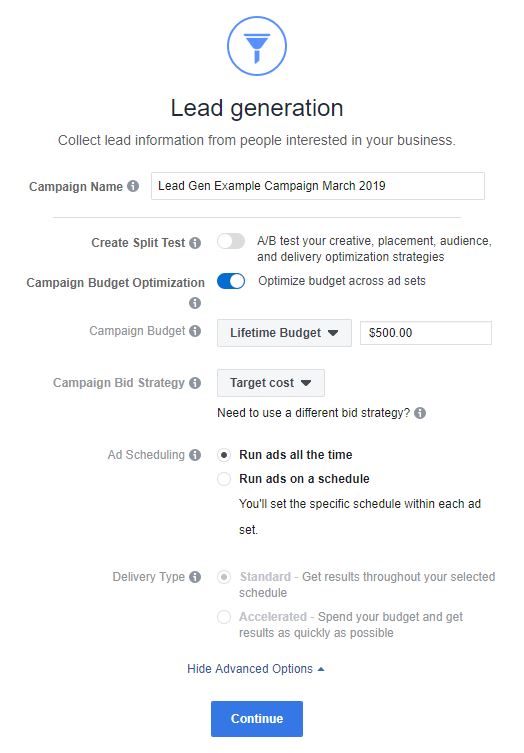
- If you go with Budget Optimization, Facebook will distribute your total campaign budget across ad sets based on the performance of those ad sets.
- As above, this option will preclude you from using the Create Split Test option.
- Choose a Campaign Budget option – either a Daily Budget or a Lifetime Budget. This choice has major implications for campaign performance. Lifetime budget would likely make more sense for a Lead Generation campaign since the Facebook algorithm is more performance-focused using a Lifetime budget.
- Set a Campaign Budget – be sure to spend enough to allow Facebook to record enough leads to learn what ad sets are working best. At minimum, you need 50 leads in a week. Assuming that you can very conservatively achieve a $10 cost per lead, you would need a budget of $500 for a week or $71 per day.
- Choose a Campaign Bid Strategy – Lowest Cost, Lowest cost with bid cap, or Target cost. This choice also has major implications for campaign performance, specifically spend efficiency vs. scalability. Lowest Cost tends to be more efficient but less scalable while Target Cost tends to be less efficient but more scalable. The former tends to be the better option for new advertisers and campaigns, especially if you are not planning to spend huge amounts of money later. Lowest cost with bid cap allows you to accelerate your spend.
- Choose Ad Scheduling – either all the time or specific days/hours. The default is all the time and allows the Facebook algorithm freer reign to optimize. Only choose to schedule hours/days if you have a specific reason.
- Choose a Delivery Type – with a Lowest Cost bid strategy, we don’t have the option to accelerate spend, so you can move on.
- As above, this option will preclude you from using the Create Split Test option.
- Assuming you have not created a Lead Generation campaign before, we will go with the Split Test option below to get the most valid performance information.

Select Optimize budget across ad sets
8. Click Continue
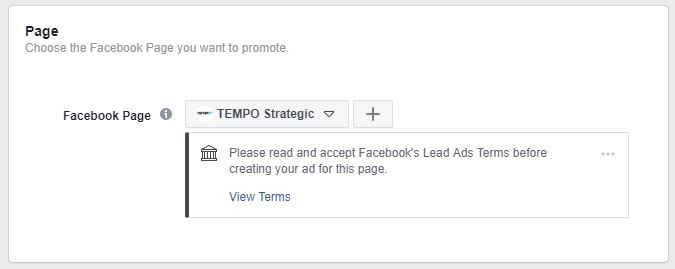
9. Select the relevant Facebook Page for your ad campaign

Facebook Page selection
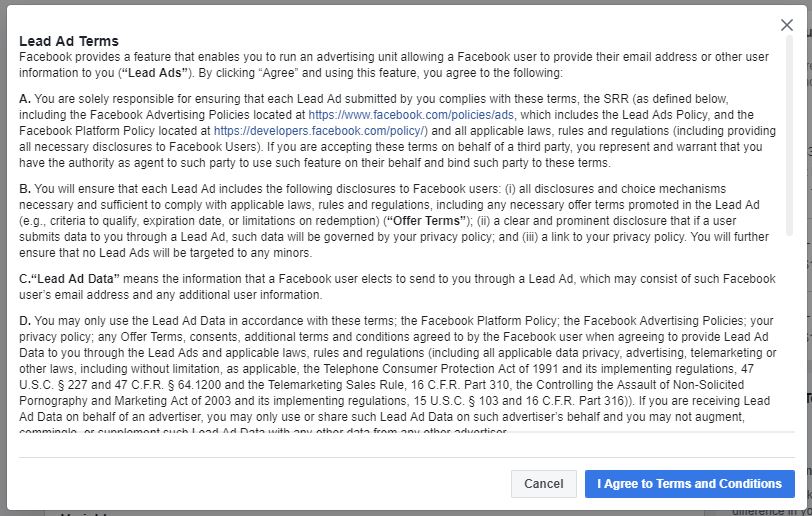
10. Accept Facebook’s Lead Ads Terms if you have not already by clicking View Terms and then “I Agree to Terms and Conditions”

Facebook Lead Ads Terms
11. Skip Catalog set up
- This option is useful when pushing product sales from Facebook/Instagram, which is not the goal of our Lead Generation campaign.

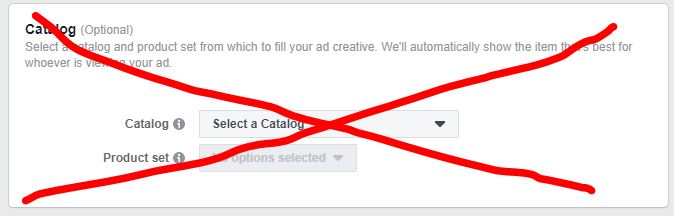
Skip the Facebook catalog set up
12. Choose a Variable to test
- There are 4 types to test, and nearly infinite combinations of options within those types. You can work through these methodically over time to refine campaign performance. We will start by testing Audience. The concept behind each of the test types is the same.

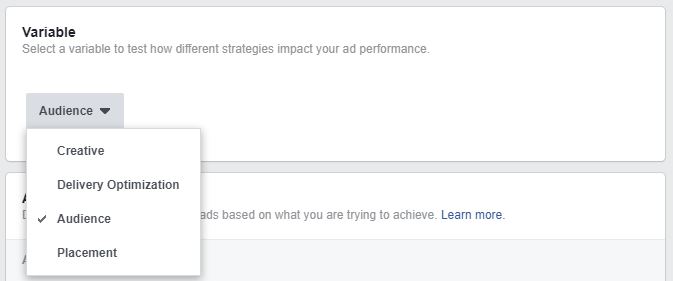
Variable Selection – choose creative, delivery optimization, audience, or placement
13. Decide on Audiences to test
- We will keep this simple by only testing 3 audiences.
BEST PRACTICE: Remember that the more audiences you decide to test, the more budget you will need to get meaningful results.
- We will use a control audience (all US users ages 18-65+), a lookalike audience of the 1% of US users closest in traits to the list of email subscribers we already have, and an interest-based audience for people interested in marketing/advertising. We can get WAY more granular than this and test many more audience types (for instance video retargeting, which can work very well with this format if you have the video assets), but we need to start somewhere.

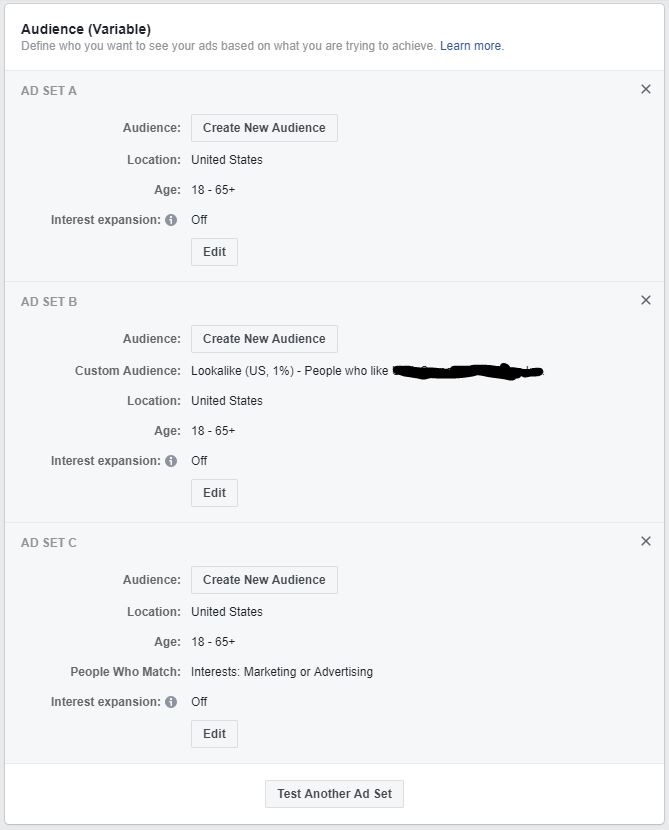
Facebook Split Test Audience Selection
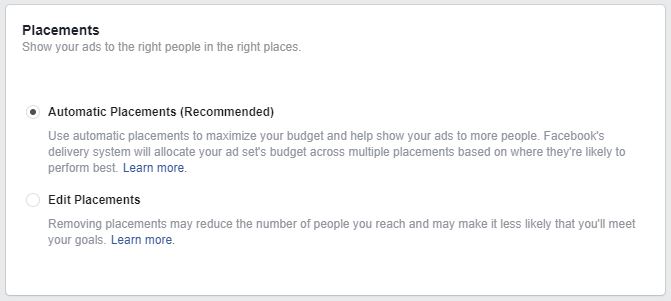
14. Choose a Placements option
- Because this is a split test for Audience and not for Placement, we should go with the default “Automated Placements” option. The image sizes and space for text vary widely between each of these formats. To really make them perform, you should do your best to make your ad look as natural as possible to that medium. You can find more on drafting quality Facebook ads here. You can find more on drafting quality Instagram Feed ads here. You can find more on drafting quality Instagram Stories ads here.

Facebook Placement Selection: Automatic Placements
15. Choose a Delivery Optimization
- As outlined above, Lowest Cost (the most efficient and default option) makes the most sense for a brand-new campaign and split test. In later iterations, you might want to choose a bid cap or a target cost per lead based on the performance of this split test.


Facebook Lead Generation Delivery Optimization options
16. Set a Split Test Budget and Schedule
- Choose a lifetime budget or a daily budget depending on the “Estimated Test Power” (the statistical tool Facebook uses to let you as the advertiser know whether the results of your split test are reliable) which Facebook recommends Lifetime or daily does not make a huge difference here because the Estimated Test Power will tell us what budget level will work.
- Choose Even Split or Weighted Split. If you knew one of the audiences would deliver a significantly cheaper cost per lead than the other two, you might want to give that audience a smaller total budget so that you can even out leads between ad sets. You might choose this option if you had already run one or more split test and have clear data on expected results that target audience. In general, however, go with an Even Split. That holds true in our current case: since you don’t have any info on expected performance, go with an Even Split.
- Choose a Schedule/Duration. 4-14 days is a good length.
- Select whether you want to end the test early if Facebook determines a winning ad set. If Facebook’s algorithm is confident enough to select one of your ad sets as the winner early, you might as well take the money saved and move onto your next Split Test or focus your next round of budget solely on the winning audience. There’s no strong reason not to choose this option, so do it! Then hit Continue.

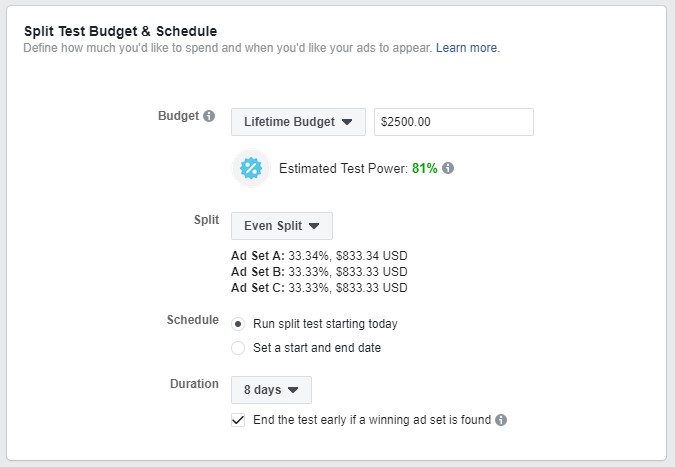
Facebook Campaign Split Test Budget and Schedule options
17. Name your ad
- As with the campaign, name the ad something easily identifiable in reporting. We’ll go with “Single Image Lead Generation Ad March 2019.”

Name your Facebook ad

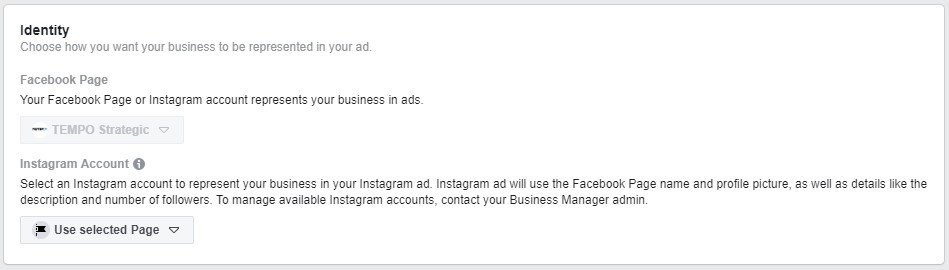
18. Choose an Instagram account to advertise from on Instagram, if available.
- Your Facebook page was already selected in the Ad Set creation process. You can use your Facebook page if you don’t have an Instagram account, but best practice is to create an Instagram account and tie it into your business manager so that your Instagram ads look more natural to that platform.

Choose an Instagram profile identity
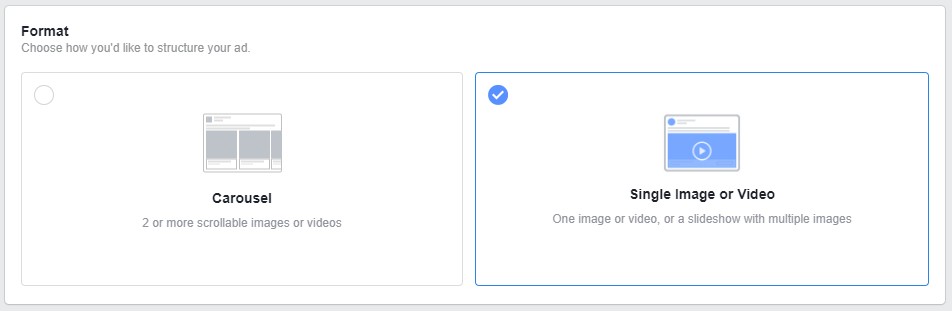
19. Choose an ad format
- The options are Carousel, Single Image, or Video, and the ad will be the same across all ad sets.
- All of these formats can work well to generate leads. In your next split test, you should test each of them if you have the creative assets available. For simplicity’s sake, we will go with a Single Image ad.

Choose an ad format for your split test
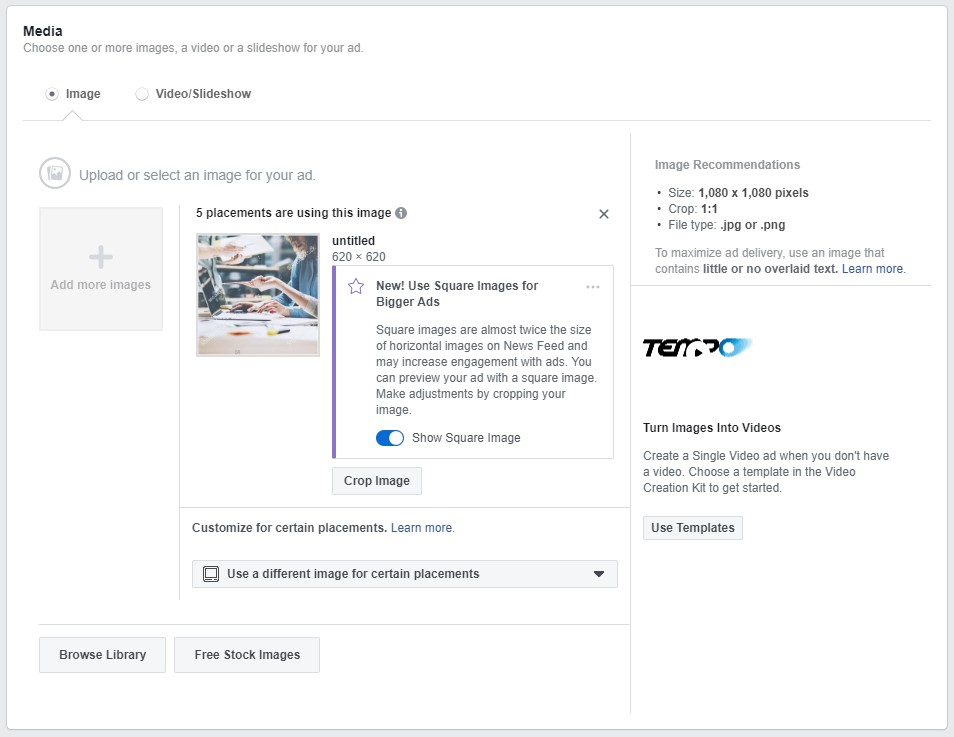
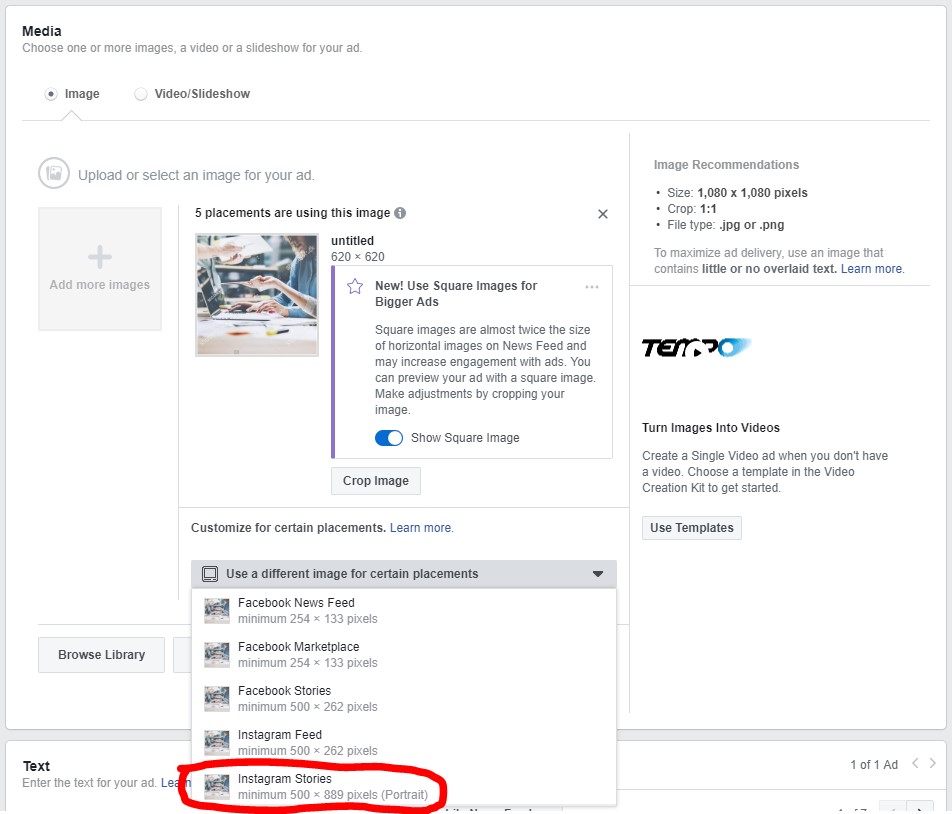
20. Upload your image
- Be sure to pay attention to Image Recommendations.
- If you don’t have an image available, Facebook has thousands of free stock images available for use.

Choose a Facebook ad image or video
- You can choose different images for different placements. This is especially important for Instagram Stories because that format, which is vertical and allows for a significant amount of text in the ad itself, will perform much more strongly if your ad looks like it belongs alongside other content users are seeing on Stories.
- Whatever you choose, you’ll want to be sure that your image is compelling and relevant to your ad text. Remember that you are asking people to give you their personal information. They are going to need a strong reason to give their data to you: an offer, or a cause, or a promise of more information. Whatever your reason, be clear and transparent.

Chose Facebook Ad format: Instagram Stories dropdown
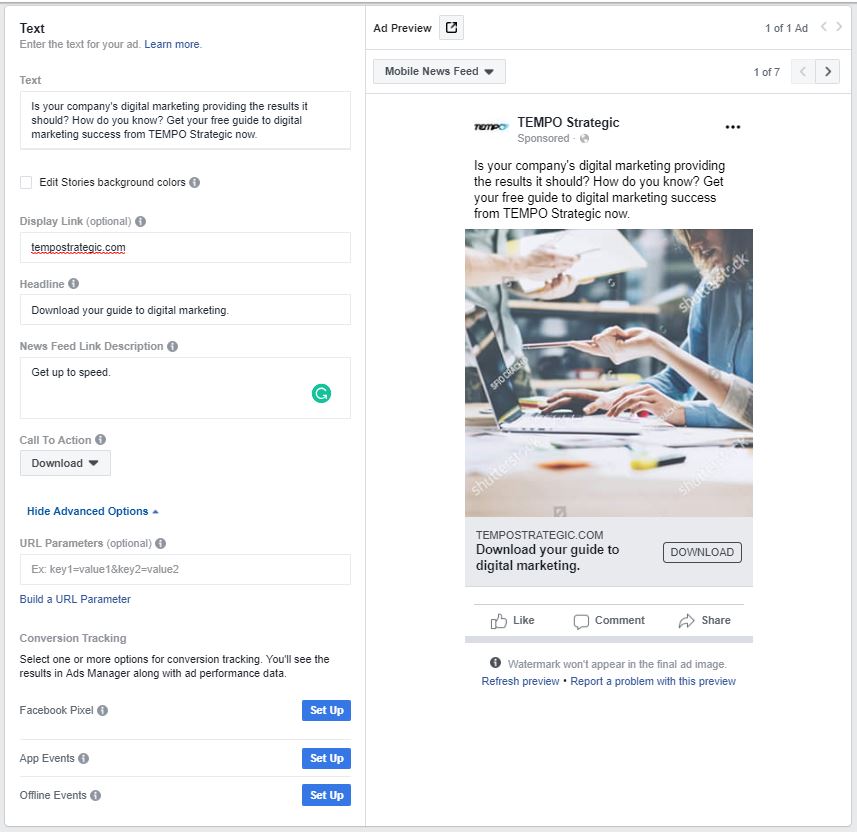
21. Draft ad copy designed to get your audience to give you their information.
CHECKLIST FOR EFFECTIVE FACEBOOK COPY
-
The copy needs to work with the image.
-
The copy needs to clearly indicate what you will provide in exchange for their info, and why it is valuable.
-
The copy needs to have a strong call to action.
-
Choose a relevant and clear Call to Action button from Facebook (i.e. Download, Sign up, Learn more, etc.)
-
Be sure to Facebook Creative Hub is a good tool for this.
-
Because this is a Lead Generation ad, you can bypass the Facebook Pixel, App Events, and Offline Events set-up options.

Facebook ad text editor options
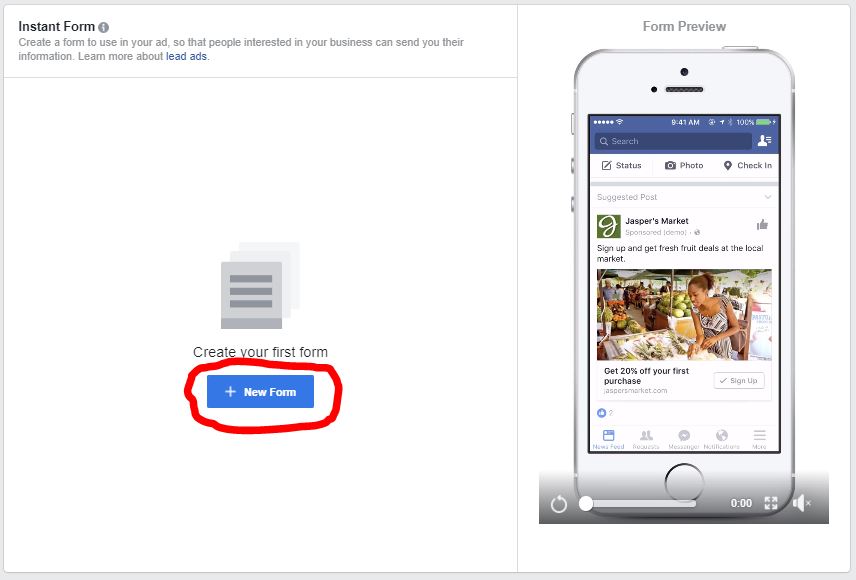
How to Create an Instant Form to collect leads directly on Facebook/Instagram

Instant form creation
22. Name your form
- Use a clear and specific name so that you can easily reference it if you plan to create multiple lead forms which you need to choose from when creating additional ads in the future.
- We will name our ad “TEMPO Lead Form March 2019”


Facebook Lead Form Name
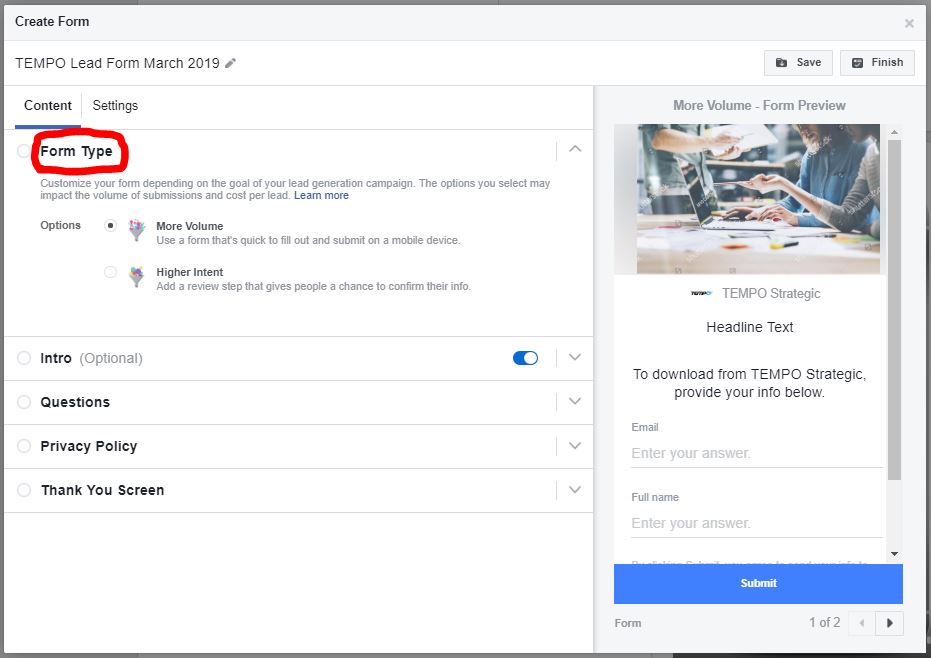
23. Choose a Form Type – More Volume or Higher Intent
- Here we come back to the concept of Friction discussed above. More Volume makes completing the form simpler by removing an information review step and so reducing friction. But it may lead to less qualified leads. Higher Intent adds an information review step to the process and so increases friction but likely leads to more highly qualified leads.
- In our example, we are just promising people a guide to digital marketing so we want to cast a wider net. We are less concerned with qualifying leads at this point. So we will choose “More Volume.”

Facebook Lead Form Type Selection
24. Edit the Intro
- Draft a headline that reminds people what you are promising them for their information.
- Decide whether you want to use the image from your ad or a different uploaded image.
BEST PRACTICE: Use the image from your ad on your lead form to give the user a more seamless experience from viewing the ad to submitting their info.
- Make the information in your intro clear and concise. If you write too much, you will increase friction by boring and/or confusing the user.

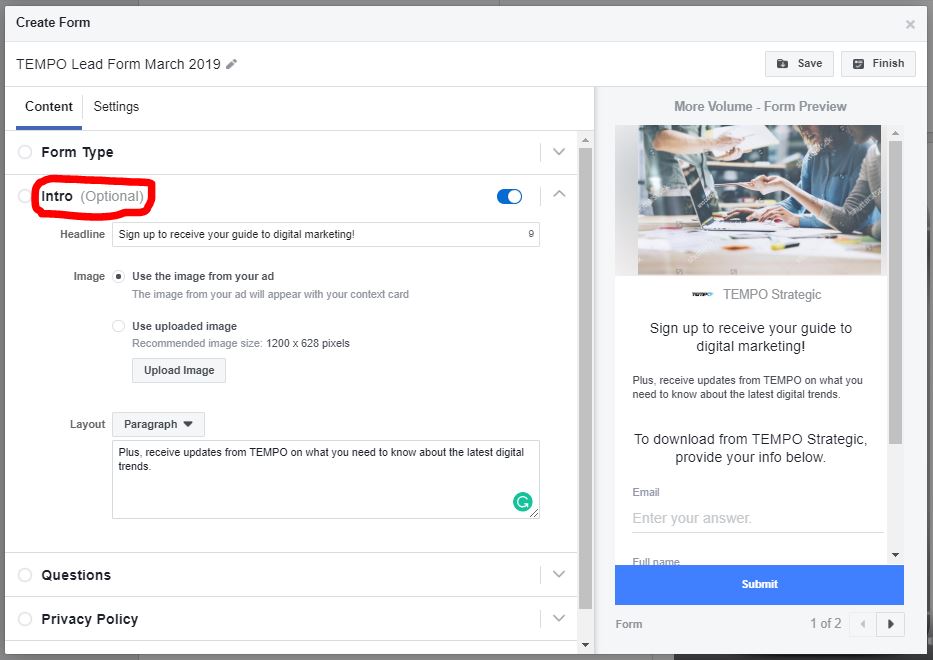
Facebook Lead Form intro editor
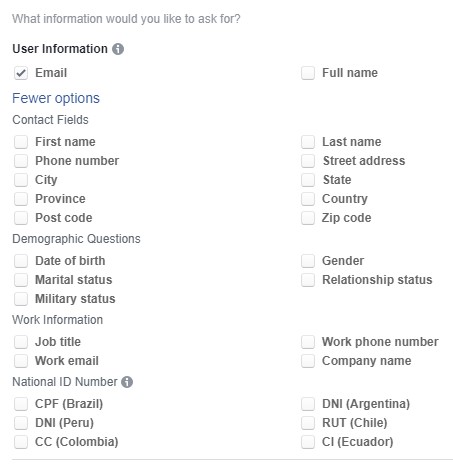
25. Choose the questions you want the user to answer
- Be very selective with what questions you want the user to answer. Be rigorous in deciding whether each question needs to be answered during this part of the marketing cycle. Each question adds friction to the process, as will complex answers or sensitive queries. Save those for follow-up emails.
- You can customize the Questions Headline which directly prompts the user to provide their info; however, the default option is usually good enough.


Facebook Lead Form Questions headline editor
- Email and Full name are the default questions. For our purposes, we want to reduce friction as much as possible, so we’ll only ask for an email address.

Facebook lead form question selection
- Decide whether you want to ask any custom questions.
- Again, unless you have a specific goal for which you need to qualify a lead with this question up front, leave this off to reduce friction.

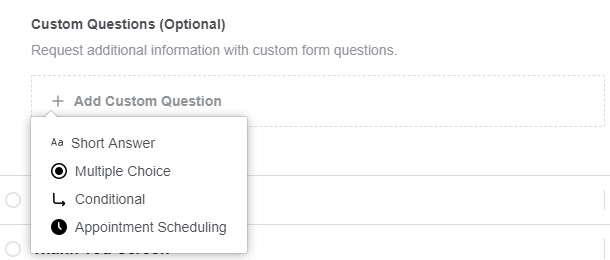
Facebook Lead Form Custom Questions editor
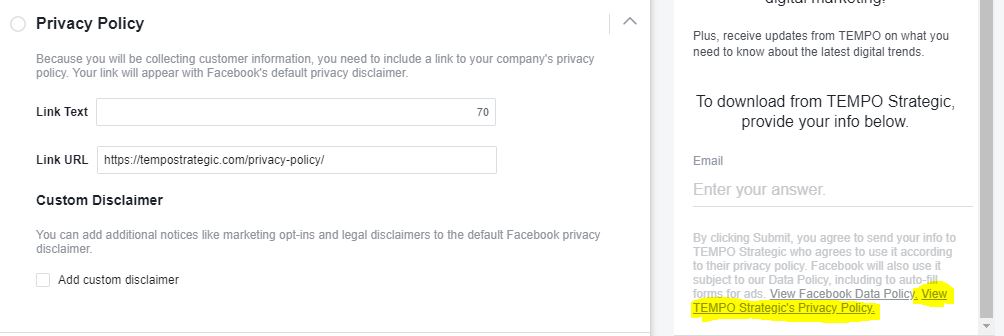
26. Link to your Privacy Policy
- Include a link to the privacy policy of the company for which you are collecting leads. If your site does not have one, draft one and put it up yesterday.
- You only need the URL, so you can leave the Link Text box blank to default to “View TEMPO Strategic’s Privacy Policy”
- Add a Custom Disclaimer if you have specific privacy or legal requirements. Otherwise, leave this blank.

Facebook Lead Form Privacy Policy set up
27. Customize the Thank You Screen
- Yes, the user has already given you their information, but this is another chance to build your relationship with that user! Confirm you have their info, say a genuine thank you, remind the user of the value of what they signed up for, or cross-promote or cross-sell your other content/products.
- Some people will immediately click through to your website from this Thank You page. If you use Google Analytics to track website and marketing performance, be sure to use the Google URL builder to tag your website link so that you can track users who click through to your site.

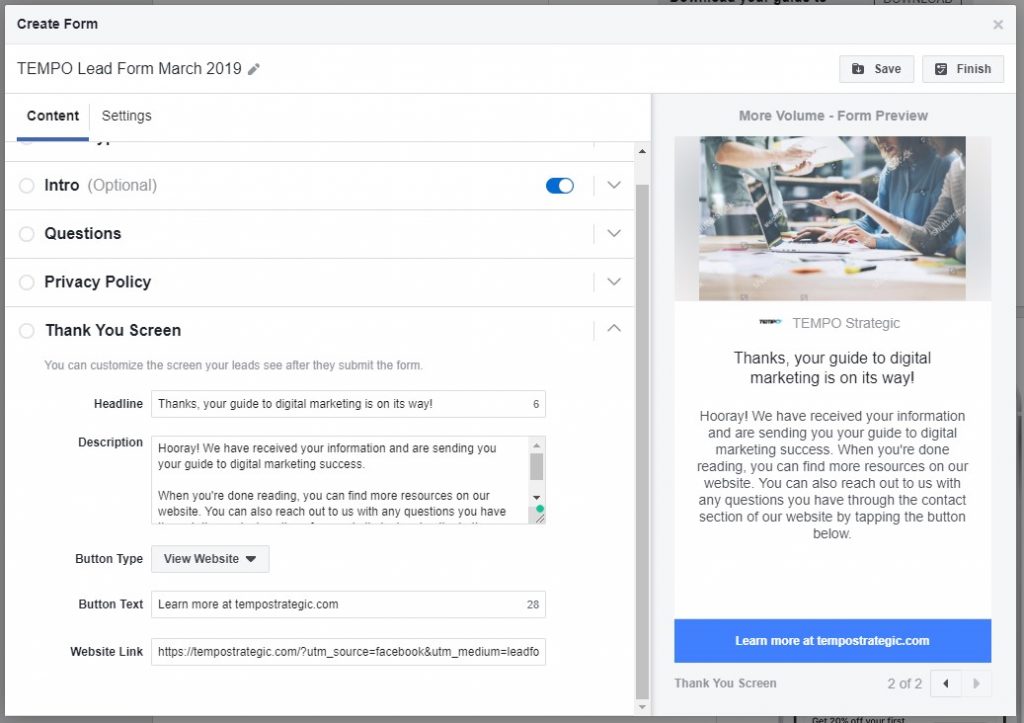
Facebook Lead Form Thank you screen customization
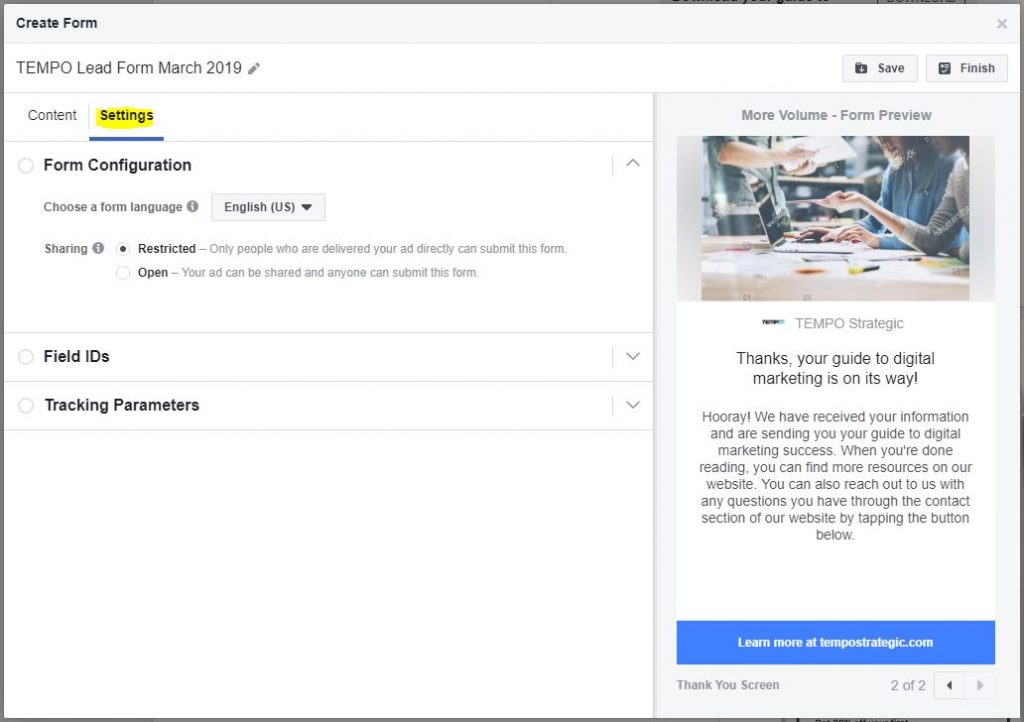
28. Check your form settings
- Click over to the Settings Tab

Facebook Lead Form Settings tab
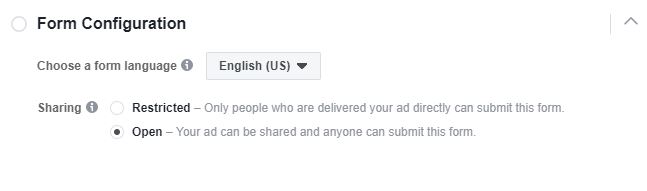
29. Set your Form Configuration
- Choose your form language
- Select a sharing option: Restricted vs Open
- The default is Restricted, where only those targeted by and directly receiving your ad can complete the form. But, unless you have specific requirements for why you wouldn’t want your form shared, set your form to Open to allow users to share the form with their friends and followers. If someone likes what you are offering enough to want to share it, let them become your advocates. Anyone they can get to complete your form after a share is icing on the cake, decreasing your cost per lead because you only pay for the ad, not for the share.

Facebook Lead Form configuration: restricted vs open
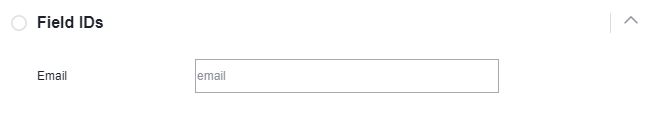
30. Set your Field IDs
- Field IDs are how the pieces of information will be output from Facebook in a spreadsheet download or when pushing data to your CRM. These can be important to change to keep customer data across marketing channels and how data in your CRM/database are already logged.
- Our example is simple – we will keep the default Field ID for “Email” as “email”

Facebook Lead Form Field IDs
31. Set your Tracking Parameters
- Adding Tracking Parameters to your form allows you to add hidden fields which will not show up on your form but will show up when you access leads via API, Download, or CRM. These are especially useful if you have multiple marketing automation campaigns or automated email drip campaigns and you want to give this audience customized content by using the Field to automatically place leads derived from this campaign into their own CRM segment.
- In our example, we will add a Parameter called “channel” with a Parameter Value of “Facebook leadform” to allow us to segment our Facebook leads when they are pushed to our CRM.

Facebook Lead Form Tracking Parameters
32. Review all your form Content and Settings
- Before you hit Finish, be very sure you have everything the way you want it to be because you will no longer be able to edit the form after this. You will be able to duplicate it and edit that new form, but the Finish button seals the form you are working on now forever.
- If you aren’t ready to hit Finish yet, you can hit Save and return to the form later to finalize it.
- If you’re happy with it, hit Finish.

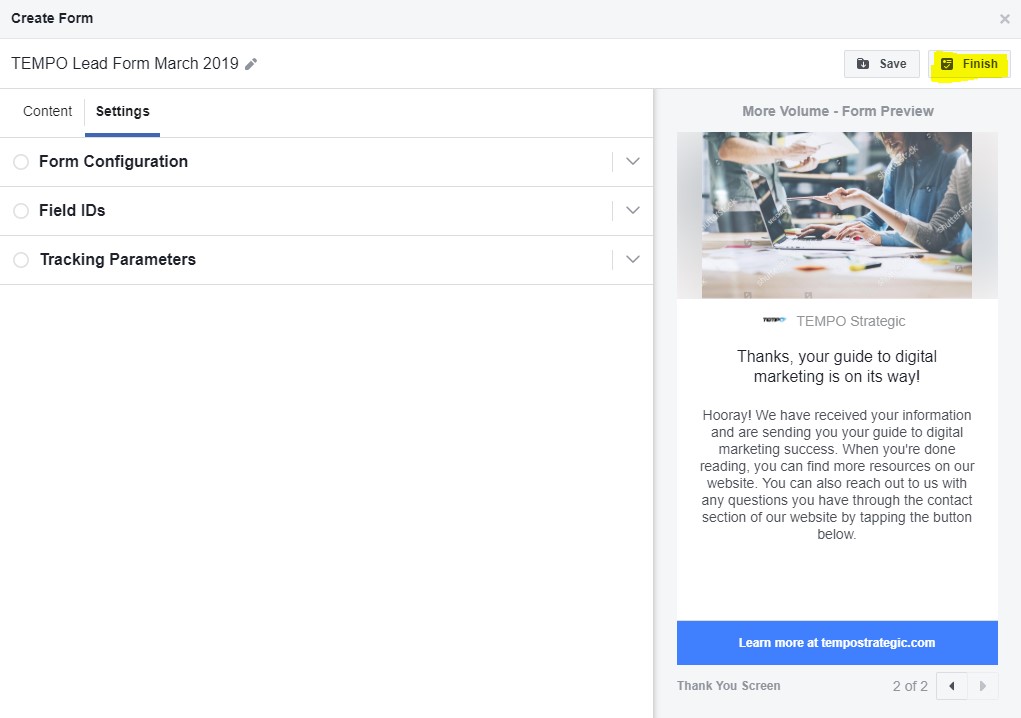
Facebook Lead Form review: select finish when 100% confident in copy and settings
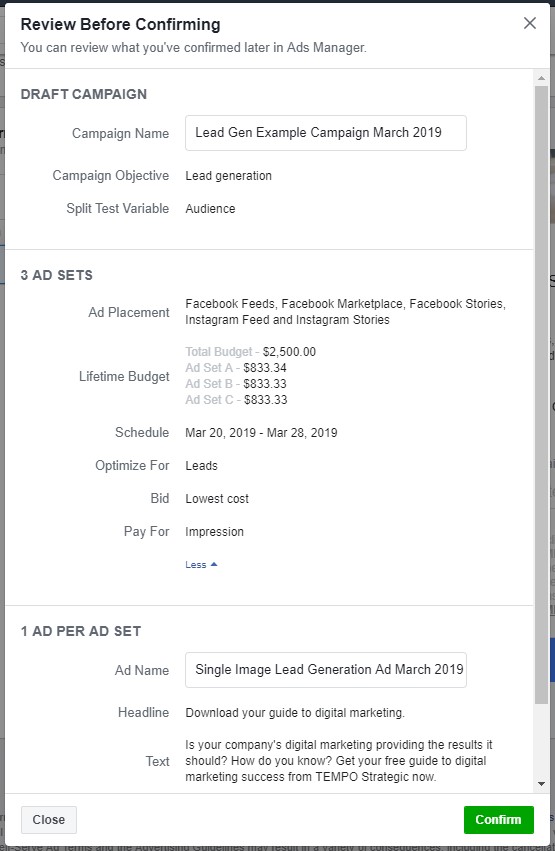
33. Hit the Review button to review your goals, targeting, budget, schedule, and ad and then hit Confirm.
- Normally you would be able to edit all of this (except for Campaign Objective) after hitting Confirm. But, because this is a Split Test and we need to keep the variables fixed to get meaningful results, once you hit Confirm, you will be locked into your settings, so be sure you have this set up the way you want!

Facebook Lead Form Review before Confirming
34. If you have a supported CRM, connect it to the Facebook page for your business.
Some CRMs will directly integrate with Facebook. Others operate using a third-party integration where a third-party integration system connects your Facebook lead ads to a CRM. If you’re looking for a third-party integration system, Zapier is an excellent place to start.
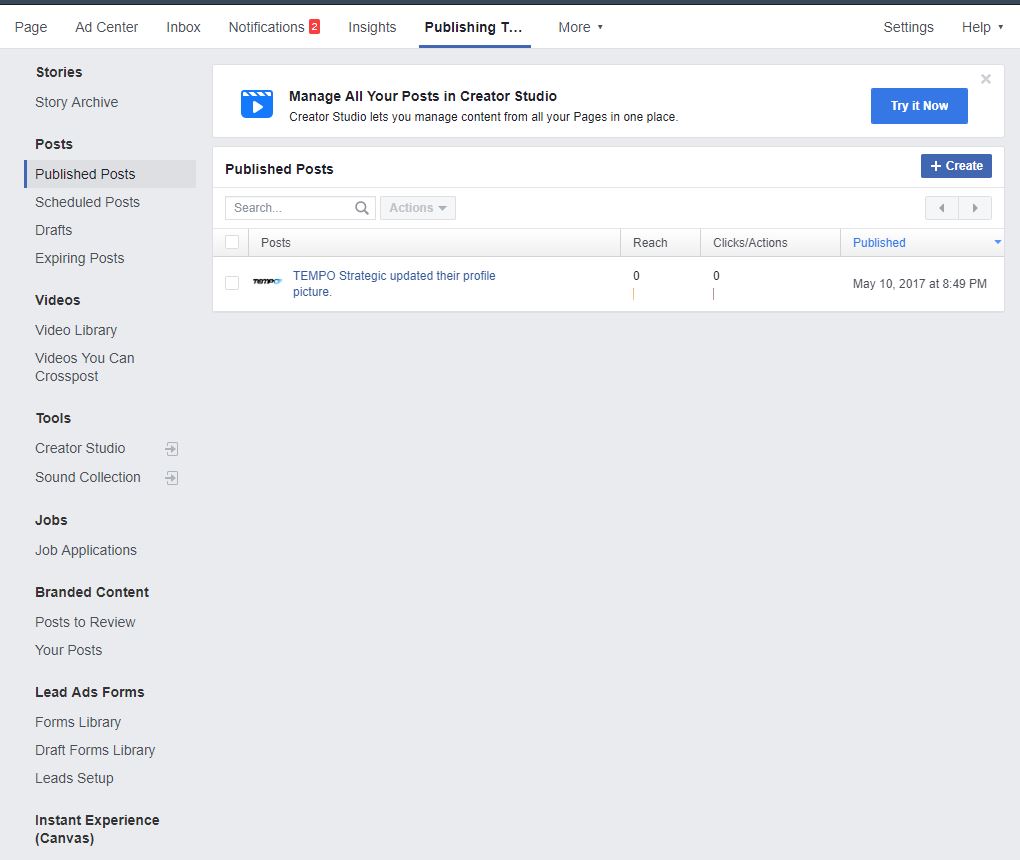
- Go to your Facebook page and click Publishing Tools

Facebook Page Publishing Tools
- Click Leads Setup

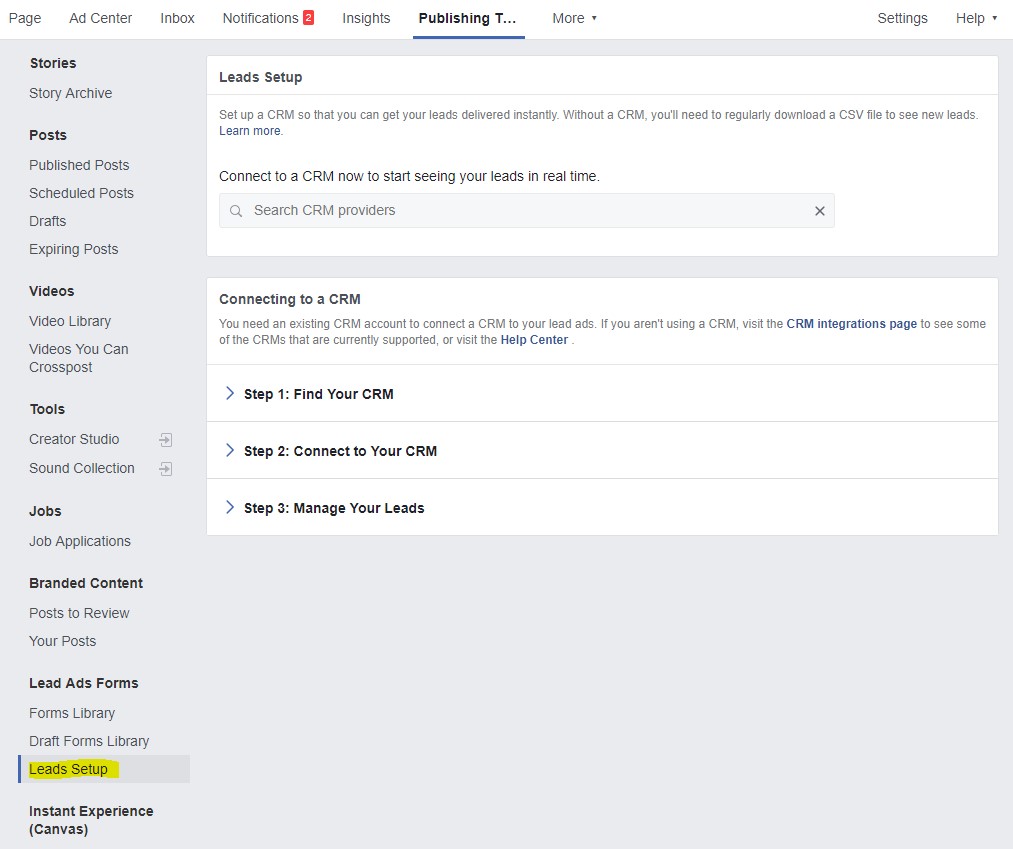
Facebook Page CRM Connection Setup
- Search for your CRM provider, click Connect, and follow the instructions provided.

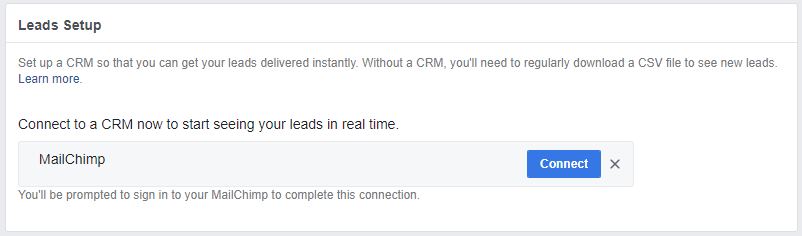
Facebook Leads CRM Connection Set up
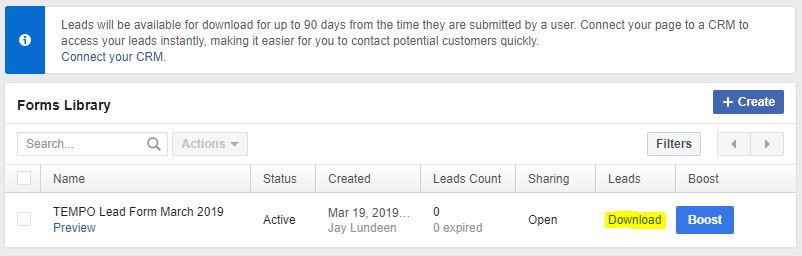
35. If you need to download your leads manually and upload them to a CRM you don’t have a plug-in like Zapier, or you want to actively review and cull leads before uploading them to a CRM, click on Forms Library, find the relevant Lead Form, and hit Download.
- Leads will only be available for download for 90 days after submission, so be sure to download them regularly if you go the manual route – multiple times per week, at least.

Facebook Lead Form download options
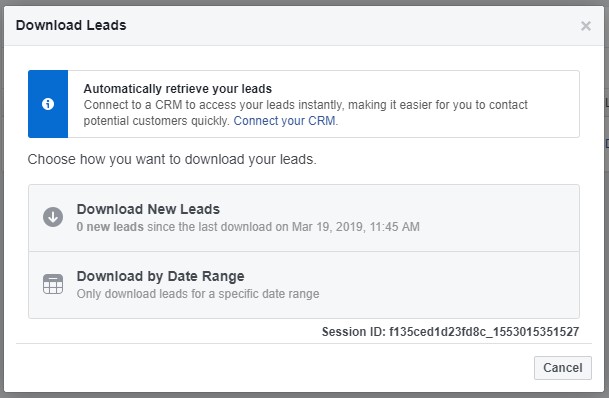
- Choose date range to download your leads.
- The easiest option here is to hit “Download New Leads” to download all leads that have come in since the last date you downloaded from Facebook. You can also choose “Download by Date Range” for a specific date range if you somehow lost some leads which need to be backfilled in your CRM. We will choose “Download New Leads.”

Facebook download leads options – new vs date range
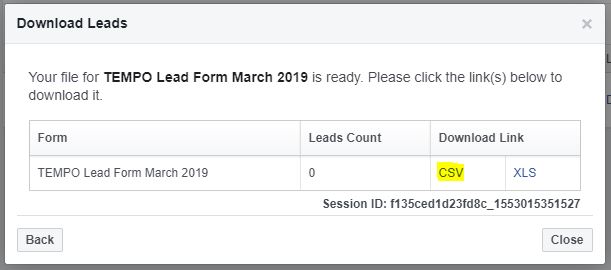
- Choose whether to download a CSV or an XLS file.
- CSV files are generally the file type of choice for upload to any CRM.

Facebook Lead Form CSV vs XLS download
- Upload your lead file to your CRM.
- Be sure you are handling user data with privacy in mind. With more and more privacy regulations coming into place across the world, some with very large fines attached for violations, you’ll want to be sure you’re doing everything you can to be compliant.
36. Monitor performance and adjust accordingly
- Analyze the results of your split test and plan additional split tests based on what you learned. Once you have learned enough about what audiences, creative, placements, and delivery optimization yields the best mix of efficiency and scalability for Cost per Lead, set up longer term campaigns using that data. (But never stop testing new combinations!)
- Compare your cost per lead to the same (or analogous) metrics on your other marketing channels. There are many reporting tools out there. Here’s some info to help you get started making a choice on the best marketing reporting tool for you.
- Determine whether your cost per lead delivers a positive ROI, ideally based on an established Customer Lifetime Value – this may involve more than just the cost per lead figure delivered by Facebook. You will want to tie marketing channel data sets together to establish a full customer journey from ad to sale to retention and how each marketing channel contributes to converting a potential customer to an actual customer. For a start down that challenging process, see more on creating a successful, data-driven marketing campaign here.
Whew, that was a lot! We know. If you’re feeling overwhelmed, we are here to help. Reach out to us any time at our contact info below to discuss how TEMPO can support your digital marketing success.
Read next: How to set up an email campaign for retail results